Are you an Apple user who has been itching to see how iOS apps work on your MacOS?
Now, with only a few steps, you can run your favourite iOS apps on your MacOS!
In this article, we will provide you with step-by-step instructions so that you can easily learn how to run iOS apps on MacOS. We will also share some tips and tricks to help make the process even smoother. So let’s get started!
What’s the Benefit of Using iOS Apps on My Mac?
Using iOS apps on Mac provides tremendous benefits in terms of productivity and speed. The apps not only help you to speed up your workflow but also provide a seamless experience across multiple devices.
By using an iOS app on Mac, you can sync files easily from your iPhone or iPad straight to your laptop; this significantly reduces the time it takes to transfer data from one device to another.
It also helps you in managing tasks more quickly, as the task list is automatically updated when changes are made on different devices. The easy synchronization of data between devices allows for faster collaboration with colleagues and partners which can help boost productivity.
All these features make using iOS apps on Mac a great way to save time and improve your workflow.
How to Check if your Mac can install iPhone or iPad Apps
The latest generation of Mac laptops is powered by Apple silicon-based chipsets. Starting with M1, all the M series chipsets powering Mac computers can also install iPhone and iPad apps on your Mac because of the similar architecture.
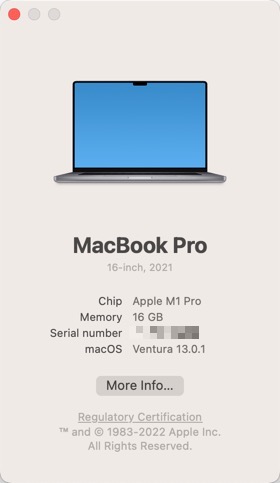
To make sure that your computer is powered by M1 Macs, M2 Macs, M1 Pro Macs, or M1 Max Macs, you can click on the apple icon appearing on the top left-hand side, then click on ‘About this Mac’, a small window will pop up, giving you the information about your laptop.
What Are the Requirements to Run iOS Apps on Macs?
The only requirement to run the iOS apps on Mac is they should be powered by an Apple silicon chipset. If you have got a MacBook Pro after 2019, chances are high it is powered by the M-based chipset, and it is capable of running iOS apps as well.
Installing iOS and iPadOS Apps From the Mac App Store
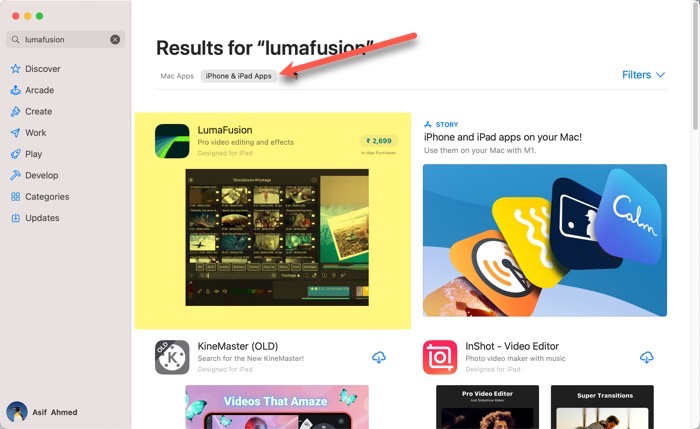
If your Mac is compatible to run iOS Apps, can do so by going to the App store (available right out of the box). Search for the app you want to download.
Then switch to iPhone & iPad Apps, it will give you the list of all the at available for iPhones and iPad.

The LumaFusion is an excellent video editing app available for iOS and can be installed on Mac as well. The same goes with other video editing apps like Inshot,
Sadly some iOS apps like Instagram, and Snapchat, are not available
Installing Apps Not Available Through the Mac App Store
There used to be some workarounds to install the apps like Instagram and Snapchat that word not available through the app store, but sadly they don’t work anymore.
The developers of each app have full control over where their app can be installed and it seems Meta (including any other app developers), does it want their app to be downloaded on Mac, despite the back supporting full architecture to run iOS apps.
Is there any way to emulate iOS?
The second best way to install iOS apps on your Mac that is not available in the Mac app store is to use some kind of emulator, that will emulate the iOS platform where you will be able to install iOS apps.
Here is a list of some of the best iOS simulators available for Mac and windows. Although, the system l will still not let you run some of the apps like Instagram.
What is the best way to use Instagram on Web, Especially on Mac?
In the past, we have shared quite a lot of ways to use Instagram on a computer. You could either do it by adding a Google Chrome extension or via the Facebook Ad Manager.
If you just want to browse Instagram, the web version of Instagram is quite well designed for or web. Instagram for web users had limited accessibility but Meta has now introduced the ability to upload content from the web version as well.

This means you can now upload Reels, along with Photos and Videos that you want to post on Instagram.


